Installing and Configuring PCI/PCI Express and PXI/PXI ExpressDAQ DevicesIncluded in the Section
- DAQ System Overview
- Setting Up PCI/PCI Express and PXI/PXI Express DAQ Hardware
- PCI/PCI Express DAQ Hardware
- PXI/PXI Express DAQ Hardware
- SC Express Hardware
- Cables and Accessories
- Configuring NI-DAQmx for NI Plug-In DAQ Devices
DAQ System Overview
Setting Up PCI/PCI Express and PXI/PXI Express DAQ Hardware
PCI/PCI Express DAQ Hardware
- Power off and unplug your computer.
- Remove the computer cover and/or the expansion slot cover.
- Touch any metal part of the computer to discharge any static electricity.
- Insert the board into the applicable PCI/PCI Express system slot. Gently rock, do not force, the device into place. Per the PCI standard, NI PCI DAQ boards with the Universal PCI connector are supported in PCI-compliant buses, including PCI-X. You cannot install PCI Express boards in PCI slots and vice versa. PCI Express boards support up-plugging into a PCI Express slot of higher lane width. For guidelines, refer to ni.com/pciexpress.
- Secure the device mounting bracket to the computer back panel rail.
- (Optional) On M Series and X Series PCI Express boards, connect the PC and the device disk drive power connectors. The disk drive power connector is a 4-pin hard drive connector on PCI Express boards that, when connected, increases the current the board can supply on the +5 V terminal. For most applications, you do not need to install the disk drive power connector. However, you should install the disk drive power connector in either of the following situations:
- You need more power than listed in the device specifications
- You are using an SCC or SC Express accessory without an external power supply, such as the SC-2345
- Replace the computer cover, if applicable.
- Plug in and power on your computer.
- Power off and unplug the PXI/PXI Express chassis.
- Identify a supported PXI/PXI Express slot in the chassis.
- Remove the filler panel of an unused PXI/PXI Express slot.
- Touch any metal part of the chassis to discharge static electricity.
- Ensure that the PXI/PXI Express module injector/ejector handle is not latched and swings freely. Note that SC Express devices do not have an injector/ejector handle.
- Place the PXI/PXI Express module edges into the module guides at the top and bottom of the chassis.
- Slide the module into the PXI/PXI Express slot to the rear of the chassis.
- Pull up on the injector/ejector handle to latch the module when you begin to feel resistance. Note that SC Express devices do not have an injector/ejector handle.
- Secure the device front panel to the chassis using the front-panel mounting screws.
- Plug in and power on your PXI/PXI Express chassis.
- Power off and unplug the PXI/PXI Express chassis.
- Identify a supported PXI Express slot in the chassis. You can place SC Express devices in only PXI Express peripheral slots, PXI Express hybrid peripheral slots, and PXI Express system timing slots. Refer to Figure 6.
- Remove the filler panel, and touch any metal part of the chassis to discharge static electricity.
- Place the module edges into the module guides at the top and bottom of the slot. When installing the module, make sure both edges are positioned inside the guides and that the module components do not come into contact with adjacent modules.
- Slide the module along the guides until it reaches the rear connector, and then seat the module by pushing the front panel until it is flush with the front panel of the chassis.
- Secure the module to the chassis using the front-panel captive screws. Tighten the screws to 0.31 N • m (2.7 lb • in.).
- Connect signals to the terminal block by loosening the captive top cover screws and removing the top cover.
- Loosen the strain-relief screws and remove the strain-relief bar.
- Prepare the signal wire by stripping the insulation no more than 7 mm (0.28 in.).
- Run the signal wires through the strain-relief opening.
- Insert the stripped end of the signal wires fully into the appropriate terminal. Refer to the label next to each screw terminal to determine the function of the terminal. Make sure no exposed wire extends past the screw terminal. Exposed wire increases the risk of a short circuit that can cause circuit failure. Note that for accurate measurements, the COM terminal for the channel being used must be connected to the ground of the AI source being measured.
- Tighten the terminal screws to a torque of 0.57 N to 0.79 N • m (5 lb to 7 lb • in.). Any wires connected to the ground must be sufficiently insulated from high voltage.
- Use the ground lugs to attach a shield wire to the ground.
- Reinstall the strain-relief bar and tighten the strain-relief screws.
- Use tie wraps to connect the signal wires to the tie-wrap holes for additional strain relief when necessary.
- Reinstall the top cover and tighten the captive top cover screws.
- Move the terminal bock into position in front of the SC Express module and engage the alignment feature with the guide on the associated module.
- Attach the terminal block to the module by pushing the terminal block straight into the module. A spring mechanism locks in the bottom of the terminal block. For safety purposes and to prevent damage to equipment when high voltages are present, all SC Express modules and terminal blocks are keyed to prevent connection between incompatible terminal blocks, modules, and/or cables.
- Tighten the mounting screw at the top of the terminal block to attach it to the SC Express module.
- Power on the chassis
Cables
- SHC68-68-EPM: High-performance shielded cable designed for M Series and X Series devices (It has individual bundles separating analog and digital signals. Each differential analog input channel is routed on an individually shielded twisted pair of wires. Analog outputs are also individually shielded.)
- SHC68-68: Lower cost shielded cable with 34 twisted pairs of wire
- RC68-68: Highly flexible unshielded ribbon cable
- CB-68LP and CB-68LPR: Unshielded connector blocks
- SCB-68A: Shielded 68-pin connector block with temperature sensor
- TBX-68: DIN-rail mountable connector block
- TB-2706: Front-panel mounted terminal block for PXI Express X Series modules (TB-2706 uses Connector 0 of your PXI/PXI Express module. After a TB-2706 is installed, Connector 1 cannot be used.)
- BNC-2110: Provides BNC connectivity to all analog signals, some digital signals, and spring terminals for other digital signals
- BNC-2111: Provides BNC connectivity to 16 single-ended analog input signals, two analog output signals, five DIO/PFI signals, and the external reference voltage for analog output
- BNC-2120: Similar to the BNC-2110 and features a built-in function generator, quadrature encoder, temperature reference, and thermocouple connector
- BNC-2090A: Desktop/rack-mountable device with 22 BNCs for connecting analog, digital, and timing signals
- Windows recognizes newly installed devices when the computer restarts. Vista and Windows 7 install device software automatically. If the Found New Hardware Wizard opens, install the software automatically as recommended for each device.
- Double-click the Measurement & Automation Explorer(MAX) icon on the desktop to open MAX.
- Expand Devices and Interfaces to confirm your device is detected. If you are using a remote real-time target, expand Remote Systems, find and expand your target, and then expand Devices and Interfaces. If your device is not listed, refresh MAX.
- Right-click the device and select Self-Test. When the self-test finishes, a message indicates successful verification or if an error occurred. If you receive an error, refer to the NI KnowledgeBase with your specific error code.
- Initialize self-calibration. For NI 62xx and NI 63xx devices, right-click the device name and select Self-Calibrate from the short-cut menu. This function measures the onboard reference voltage of the device and adjusts the self-calibration constants to account for any errors caused by short-term fluctuations in the environment. Disconnect all external signals when you self-calibrate a device.
- Click Next to begin the calibration. You may have to wait a few minutes.
- Click Finish.
- Right-click the device name and select Configure.
- Click on the Accessory tab, and select the accessory or terminal block you have attached to each connector of your DAQ device, if applicable. Note that for SC Express modules, the terminal block is automatically detected.
- Click OK.
This document provides step-by-step instructions for installing and configuring your PCI/PCI Express or PXI/PXI Express DAQ devices. Before you begin, you must install your application development environment and NI-DAQmx driver software. Refer to the Installing LabVIEW and NI-DAQmx document for more information.
Figure 1 shows a typical DAQ system, which includes sensors, transducers, signal conditioning devices, cables that connect the various devices to the accessories, the DAQ device, application development software, and the PC. The following sections cover the installation of a typical DAQ system.
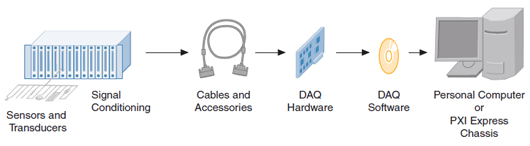
Figure 1. Components of a Typical DAQ System
PCI/PCI Express and PXI/PXI Express DAQ hardware ranges from low-cost, multifunction PCI/PCI Express boards to high-performance, conditioned measurement PXI/PXI Express modules.

Figure 2. PCI/PXI M Series and PCI Express/PXI Express X Series
Complete the following steps to install a PCI or PCI Express DAQ board:

Figure 3. Installing a PCI/PCI Express Board: (1) PCI/PCI Express DAQ Board, (2) PCI/PCI Express System Slot, and (3) PC With PCI/PCI Express Slot
Attach the PC disk drive power connector to the disk drive power connector on the board as shown in Figure 4. Do not use a power connector that is in the same power chain as your computer’s hard drive.

Figure 4. Connecting to the Disk Drive Power Connector: (1) Device Drive Power Connector and (2) PC Disk Drive Power Connector
Complete the following steps to install a PXI or PXI Express DAQ module:

Figure 5. Installing a PXI/PXI Express Module in the Chassis: (1) PXI/PXI Express Chassis, (2) PXI/PXI Express System Controller, (3) PXI/PXI Express Module, (4) Injector/Ejector Handle, (5) Front-Panel Mounting Screws, (6) Module Guides, and (7) Power Switch

Figure 6. Symbols for PXI Express/PXI Express Hybrid/PXI Slots: (1) PXI Express System Controller Slot, (2) PXI Express Peripheral Slot, (3) PXI Express Hybrid Peripheral Slot, and (4) PXI Express System Timing Slot
Ensure that you install the PXI or PXI Express module in the appropriate slot. PXI Express modules can go in only PXI Express slots or PXI Express hybrid slots. Refer to the chassis documentation for details.
Complete the following steps to install an SC Express module:

Figure 7. TB-4300/4300B Parts Locator Diagram: (1) Strain-Relief Screws, (2) Strain-Relief Bar, (3) Tie Wrap Holes, (4) Ground Lugs, (5) Terminal Block to Module Connector, (6) Captive Top Cover Screws, (7) Top Cover, (8) Tie Wraps, and (9) Signal Wires

Figure 8. Installing a Terminal Block on a SC Express Module: (1) PXI Express Controller, (2) PXI Express Chassis, (3) Mounting Screw, (4) Terminal Block, (5) SC Express Module, and (6) Alignment Feature
For compliance with electromagnetic compatibility (EMC) requirements, this product must be operated with shielded cables and accessories. If unshielded cables or accessories are used, the EMC specifications are no longer guaranteed unless all unshielded cables and/or accessories are installed in a shielded enclosure with properly designed and shielded input/output ports.
NI offers a variety of products to use with PCI Express/PXI Express devices, including cables, connector blocks, and other accessories.
In most applications, you can use the following cables:
Connect one cable to each connector on your PCI Express/PXI Express device. Not all devices have multiple connectors.
NI offers several styles of screw terminal connector blocks. Use an SHC68-68-EPM shielded cable to connect an X Series device to a connector block, such as the following:
You can use one screw terminal accessory with the signals on either connector of your dual-connector device. You can use two screw terminal accessories with one device by using both connectors.
You can use the SHC68-68-EPM shielded cable, to connect your DAQ device to BNC accessories, such as the following:
You can use one BNC accessory with the signals on either connector of your X Series device. You can use two BNC accessories with one device by using both connectors.
Complete the following steps to configure your NI-DAQmx software for use with PCI/PCI Express and PXI/PXI Express DAQ hardware:

Figure 9. MAX

Figure 10. Self-Test

Figure 11. Self-Calibrate

Figure 12. Device Properties
- Click OK
No comments:
Post a Comment